

Create an image analysis app using Azure Computer Vision with React App
An AI project for Frontend Development

Introduction
In this tutorial, I will be creating a simple image recognition app in order to explain how to integrate Azure Computer Vision into client-side applications. You could also adapt the steps here to build similar applications using other services in Azure Computer Vision.
Prerequisites: Knowledge of React.js, An Azure account (you can get it free here), Github, Hosting service e.g. Netlify
Steps:
Step 1. Create and setup React App, then install dependencies
- Start by creating the react project:
npx create-react-app <APP_NAME>
cd <APP_NAME>
Delete unused default files in boilerplate e.g. App.test.js, App.css
Install Azure Computer Vision & MS Rest Azure npm package
npm i @azure/ms-rest-azure-js @azure/cognitiveservices-computervision
Step 2. Setup resources on Azure
Log in to the Azure Portal
Create a new Computer Vision resource in Azure
Fill out the form with the required information
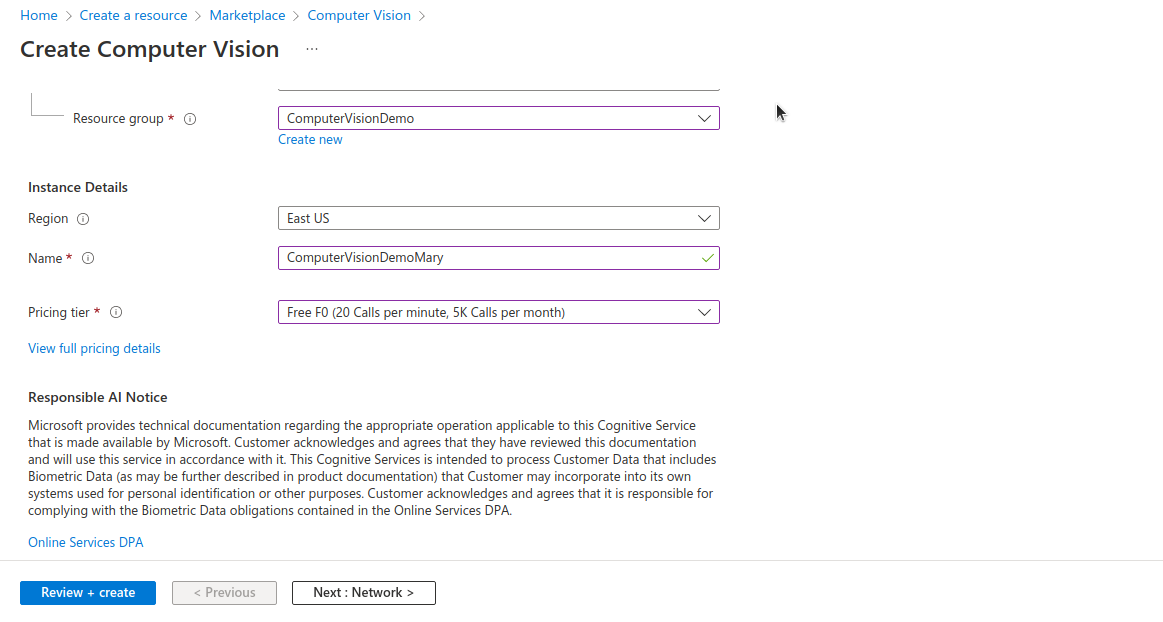
Click on 'Review+Create'
The screen below shows after the resource has been deployed
Click on manage keys to copy the API key and endpoint
Step 3. Add Azure details to the local React App
In the react app root folder, create a new file called .env to store Azure access information in your local environment i.e.
<APP_NAME>/.envOpen the .gitignore file and add
.envto the listOpen the .env file and save the API key and endpoint here
// <APP_NAME>/.env
REACT_APP_apiKey = <YOUR_API_KEY>
REACT_APP_endPoint = <YOUR_ENDPOINT>
- In the terminal, run the command
npm startto view the app in your browser
Step 4. Creating the Azure Vision Component
Create a new folder called components in
./srcCreate a new file called AzureVisionService.js
In the new file, copy and paste the code below, it contains information for requesting from the API. The documentation to better understand this part of the code is here. The
describeImagemethod used is one of the available Azure Vision API methods. It describes an image with complete English sentences. Another similar method is theanalyzeImagemethod which extracts a rich set of visual features based on the image content.
// ./scr/components/AzureVisionService

// Importing the Azure SDK client libraries
import { ComputerVisionClient } from '@azure/cognitiveservices-computervision';
import { ApiKeyCredentials } from '@azure/ms-rest-js';

// Authentication requirements
const key = process.env.REACT_APP_apiKey;
const endpoint = process.env.REACT_APP_endPoint;

// Cognitive service features
const options = {
    maxCandidates: 5,
    language: "en"
  };

// Describe Image from URL
export const computerVision = async (url) => {

    // authenticate to Azure service
    const computerVisionClient = new ComputerVisionClient(
        new ApiKeyCredentials({ inHeader: { 'Ocp-Apim-Subscription-Key': key } }), endpoint);

    // describe image using the describeImage method
    const analysis = await computerVisionClient.describeImage(url, options)
    .then((result) => {
        console.log("The result is:");
        console.log(result);
        return { "URL": url, ...result};
      })
      .catch((err) => {
        console.log("An error occurred:");
        console.error(err);
        alert(err + "Upload an image with a smaller size");
      });

    // all information about image
    console.log("This is:" +analysis);
    if(analysis === undefined){
        return "There is something wrong with the image"
    }
    return { "URL": url, ...analysis};
}
Step 5: Connect the AzureVision Component with the rest of the app.
- Import the required functions from the AzureVIsion Component into App.js
// ./src/App.js
import React, { useState } from 'react';
import { computerVision } from './components/AzureVisionService';

function App() {
  const [file, setFile] = useState(null);
  const [analysis, setAnalysis] = useState(null);
  const [processing, setProcessing] = useState(false);

  const handleChange = (e) => {
    setFile(e.target.value)
  }
  const onFileUrlEntered = () => {

    // hold UI
    setProcessing(true);
    setAnalysis(null);

    computerVision(file).then((item) => {

      // reset state/form
      setAnalysis(item);
      setFile("");
      setProcessing(false);
    });

  };

  // Display JSON data in readable format
  const PrettyPrintJson = (data) => {
    return (<div><pre>{JSON.stringify(data, null, 2)}</pre></div>);
  }

  const DisplayResults = () => {
    return (
      <div>
        <h2>Computer Vision Analysis</h2>
        <div><img src={analysis.URL} height="200" border="1" alt={(analysis.description && analysis.description.captions && analysis.description.captions[0].text ? analysis.description.captions[0].text : "can't find caption")} /></div>
        {PrettyPrintJson(analysis)}
      </div>
    )
  };

  //Describe image
  const Describe = () => {
    return (
    <div>
      <h1>Describe image</h1>
      {!processing &&
        <div>
          <div>
            <label>URL</label>
            <input type="text" placeholder="Enter an image URL" size="50" onChange={handleChange}></input>
          <button onClick={onFileUrlEntered}>Describe</button>
          </div>
        </div>
      }
      {processing && <div>Processing...</div>}
      <hr />
      {analysis && DisplayResults()}
      </div>
    )
  }

  return (
    <div>
      <Describe/>
    </div>

  );
}

export default App;
Step 6: Hosting your web app
You could use any preferred hosting service like Azure Static Web Apps, Netlify, Vercel, Firebase or Heroku. For this tutorial, I'll make use of Netlify. One important thing to note is that whichever hosting platform you use, remember to add the REACT_APP_apiKey and the REACT_APP_endPoint to the host environment variables.
The first step here is to push the local react app to Github. Create a new empty repository in Github, you should get the screen shown below
In your local react app folder, open a new terminal. Then run the following commands
// In bash terminal
git init
git add .
git commit -m "first commit"
git branch -M main
git remote add origin https://github.com/<USERNAME>/<REPO_NAME>.git
git push -u origin main
Your code is now pushed to Github. Next, open your hosting website and import the existing project from Github.
In the build and deploy setup interface, click on 'Advanced Settings' then 'Add New Variable' to store the secret keys
Then deploy your site
Your site is deployed!!


